
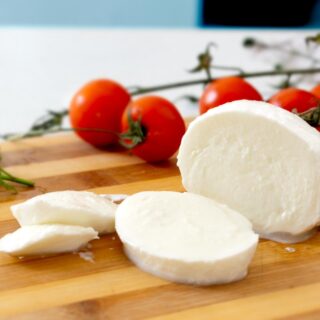
Learn how to make delicious homemade mozzarella cheese from scratch. Follow our simple step-by-step guide and recipe video to shape fresh mozzarella balls and braids.
Are you ready to embark on a culinary adventure that will transform your kitchen into an artisanal cheese workshop? Making homemade mozzarella is a rewarding process that allows you to create fresh, flavorful cheese with your own hands. While it may seem daunting at first, this step-by-step guide will walk you through the entire process, from selecting the right ingredients to mastering the art of stretching and shaping your mozzarella. By following these instructions and watching the accompanying video recipe, you’ll soon be crafting delicious, authentic mozzarella that rivals any store-bought variety. Get ready to impress your friends and family with your newfound cheese-making skills!
Ingredients Needed for Homemade Mozzarella
To embark on your homemade mozzarella-making journey, you’ll need to gather a few key ingredients. The quality of these components will significantly impact the final product, so it’s crucial to source them carefully.
- 5 liters of raw cow’s milk
- whole unsweetened yogurt, one teaspoon per liter of milk (we do not use citric acid because with yogurt it is a more natural process)
- liquid rennet (see the quantities on the package). If you want, you can replace the liquid rennet with powdered rennet, which you will then have to dissolve in a little water, following the instructions on the package.
- Cold water
- Salt
- Ice
Raw Cow’s Milk
The foundation of your mozzarella is raw cow’s milk. You’ll need approximately 5 liters (1.3 gallons) of unpasteurized milk. This type of milk is typically available from local dairy farms or through specialized vending machines. Don’t worry about safety because during the process the milk will reach quite high temperatures.
Raw milk is essential because it contains unaltered proteins, particularly casein, which are crucial for the cheese-making process. The pasteurization process used for store-bought milk can alter these proteins, making it unsuitable for mozzarella production.
Rennet
Liquid rennet is a vital ingredient in the cheese-making process. It’s an enzyme that helps coagulate the milk, forming curds. The amount of rennet you’ll need can vary, so it’s best to follow the instructions on the package for the specific brand you’re using.
Yogurt
Instead of citric acid, this recipe calls for whole, unsweetened yogurt. You’ll need one teaspoon of yogurt per liter of milk, which equates to about 5 teaspoons for this recipe. Using yogurt provides a more natural approach to acidifying the milk, contributing to the overall flavor and texture of your homemade mozzarella.
By carefully selecting these three key ingredients – raw cow’s milk, liquid rennet, and whole unsweetened yogurt – you’ll be well-equipped to begin your mozzarella-making adventure. Remember, the quality of your ingredients will directly influence the taste and texture of your final product, so choose wisely.
Equipment You’ll Need to Make Mozzarella at Home
To embark on your homemade mozzarella-making journey, you’ll need to gather specific equipment to ensure a successful outcome. Here’s a comprehensive list of the essential tools required for crafting this delicious Italian cheese in your own kitchen.
Basic Utensils
You’ll need a large, non-reactive pot, preferably stainless steel, with a capacity of at least 6 liters to accommodate the milk and provide ample space for stirring. A long-handled spoon or ladle is crucial for mixing ingredients and scooping curds. Additionally, a long knife will be necessary for slicing the curd during the cheese-making process.
Temperature Control
Precise temperature management is vital in mozzarella production. Invest in a reliable digital thermometer that can accurately measure temperatures between 30°C and 45°C (86°F to 113°F). This tool will help you monitor the milk’s temperature throughout the process, ensuring optimal conditions for curd formation and stretching.
Straining and Molding
A large colander or cheesecloth-lined sieve is essential for separating the curds from the whey. You may also want to have cheese molds on hand if you prefer to shape your mozzarella into specific forms. For a more rustic approach, a slotted spoon can be used to scoop and shape the cheese by hand.
Specialized Equipment
While not strictly necessary, a pH meter can be a valuable tool for serious cheese makers, allowing you to monitor the acidity levels of your milk and curds. Additionally, food-grade rubber gloves will protect your hands during the stretching phase, when the cheese can reach scalding temperatures.
Watch Homemade Mozzarella Video Recipe
Step-by-Step Instructions for Making Mozzarella Cheese
Preparing the Milk
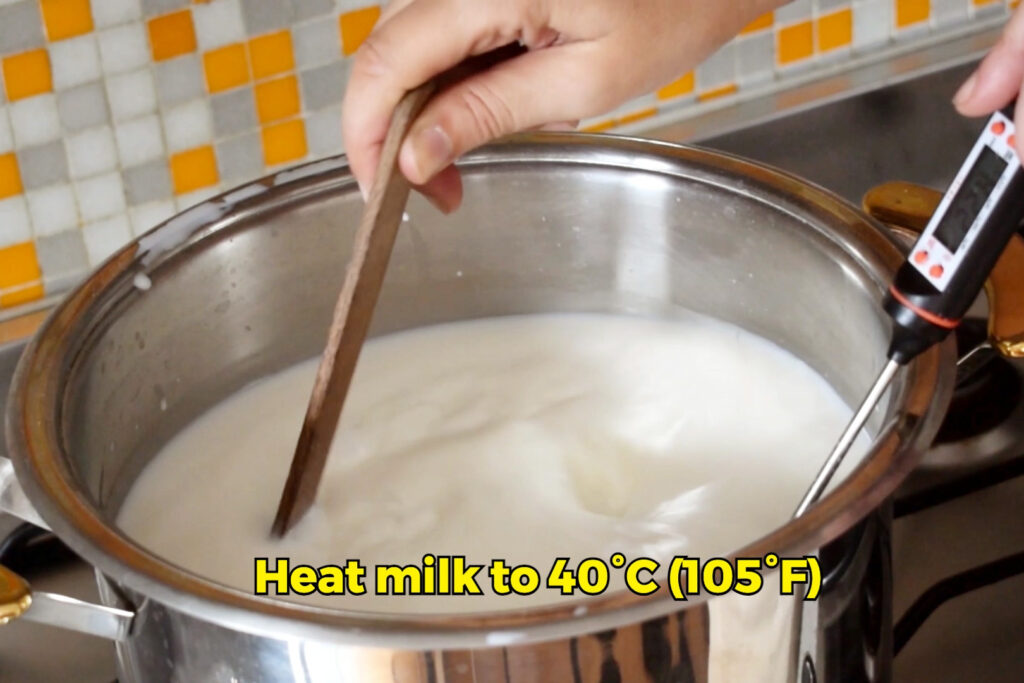
In a large steel pot, add the cold milk and heat over a moderate heat source for approximately 10 minutes. While heating, stir continuously with a wooden spoon to reach a uniform temperature of 40°C (105°F) throughout the milk. Use a cooking thermometer for accuracy (1).
Adding Rennet and Coagulation
Remove the milk from the heat source, and add the yogurt and rennet, stirring gently to combine. This natural culture will help acidify the milk, creating the ideal environment for cheese formation. Cover the pot with a lid and allow it to rest undisturbed for one hour at room temperature. For optimal maturation of the milk, maintain a temperature of 37°C (98°F). To achieve this temperature, place the covered pot of hot milk inside an turned off oven and close the door. During this time, the milk will coagulate, forming a solid curd.
Cutting and Heating the Curd
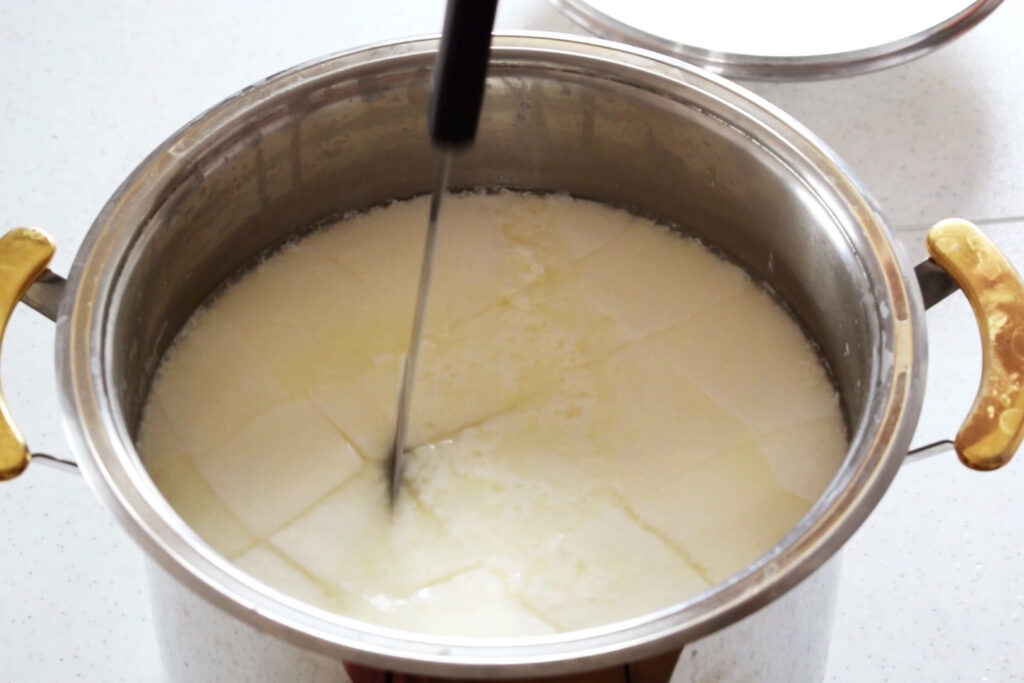
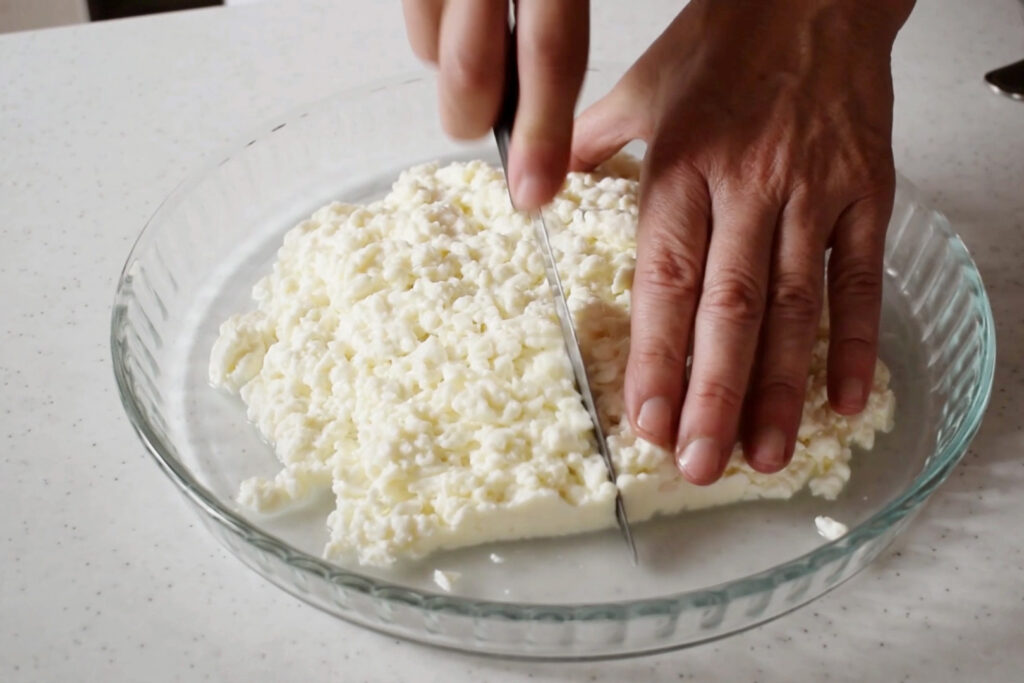
After the first hour, the milk started to curdle, so with the long blade of a knife we make crisscross cuts to obtain squares (2). Then we cover the pot with the lid and place a cloth over the lid and let it rest for another 20 minutes to facilitate the separation from the whey.
After allowing time, you can observe two distinct compounds in the pot: One resembles ricotta in appearance but with a firmer consistency, this is the curd. The other is a yellowish liquid known as whey. Now we break the rennet cubes into smaller pieces with a whisk. Then we cover the pot with a lid and cloth and let it rest for an additional 4 hours to further separate the whey and harden the curd.
Draining and Cheddaring
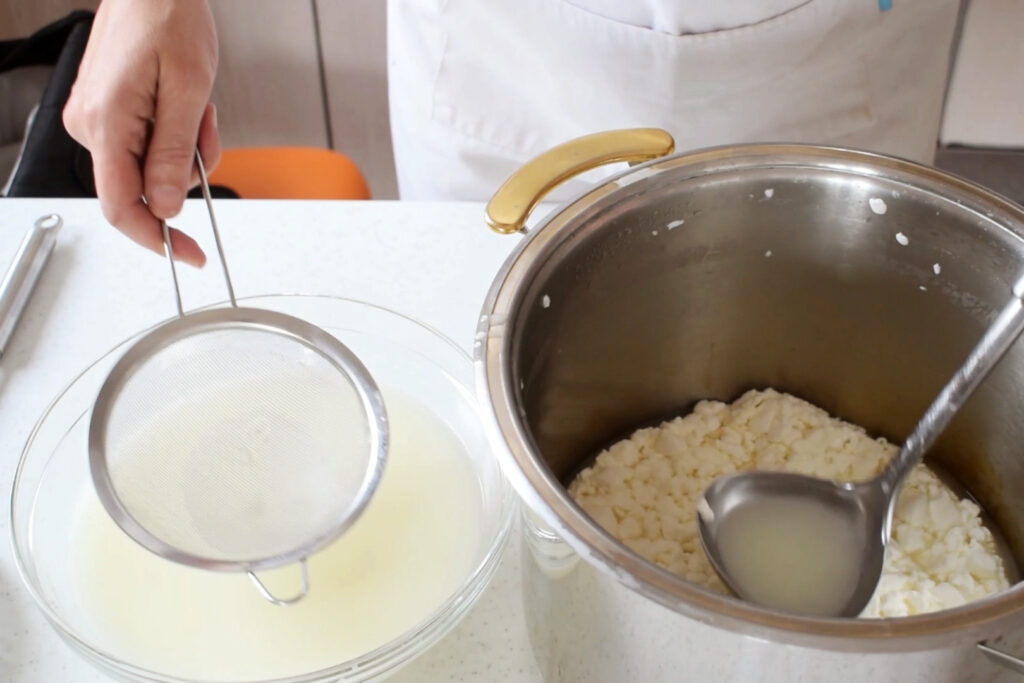
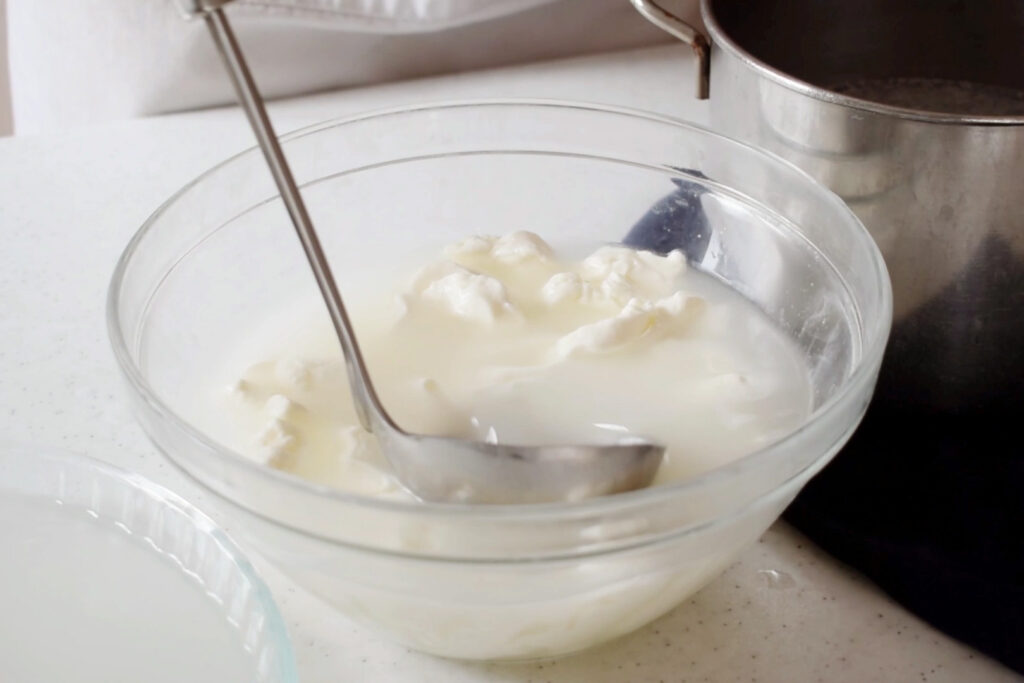
After resting, the curd settles at the bottom of the pan, so using a ladle we remove the whey (3). Then using a slotted spoon we put the curd in a colander and press well so the remaining whey can drain and allow the curd and its vapors to reach the proper acidity level. The ideal place for draining at a temperature of 37°C (98°F) is inside the turned off oven.
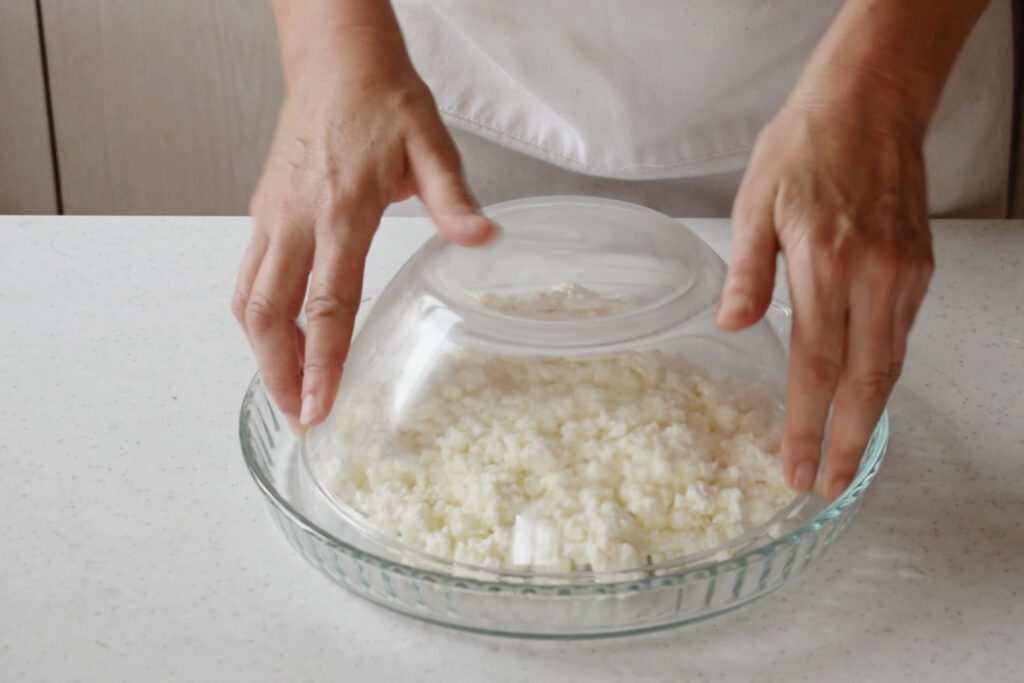
After that, once draining finishes, we place the curd on a plate, cover it, and leave it to mature in the turned off oven. The maturation phase lasts about 18 hours (4).
Testing
To test if the curd has reached the proper acidity level and texture, bring a small pot of water to a boil on the stove. Once boiling, remove the pot from the heat and add a piece of curd. Using a stick, check the curd by twisting it inside the pot. It should form a long thread or feel very elastic and malleable if the acidity is correct. The curd is ready when it starts to stretch during this test.
Stretching and Shaping
We place the curd on a work table and cut it into strips (5). At the same time, we prepare two small pots of water. We will keep one pot on the stove to boil, maintaining a temperature of 90°C (194°F). The other pot we will keep at a temperature of 50°C (122°F).
We also prepare another container with 2 liters of very cold water and dissolve 18 grams of salt, stirring with a spoon. This brine, also called preserving liquid, will allow the mozzarella to be preserved for several days. We also add ice cubes.
In another container we insert the curd strips and first add a little water at 50°C (122°F) to soften it. Then we add two ladles of water at 90°C (194°F) and mix until the mixture begins to take shape.
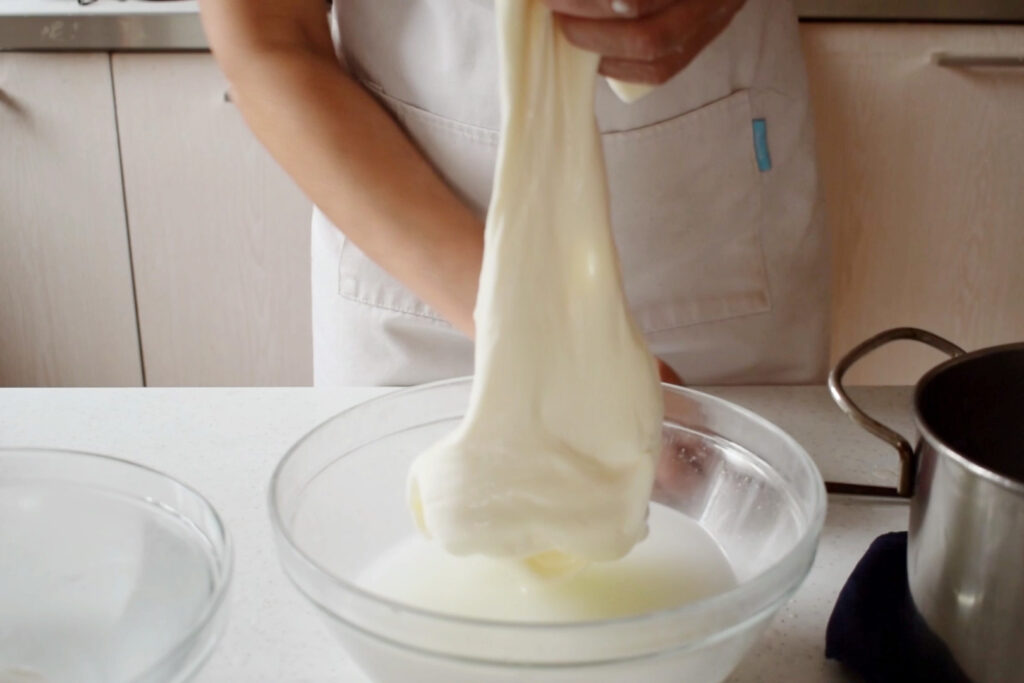
Now, the water of the mozzarella is about 70°C (158°F). So with a ladle we remove half the water from the bowl to add the boiling water (6). From here on it will begin to string. We continue to substitute the warm water with boiling water until a single mass is formed.
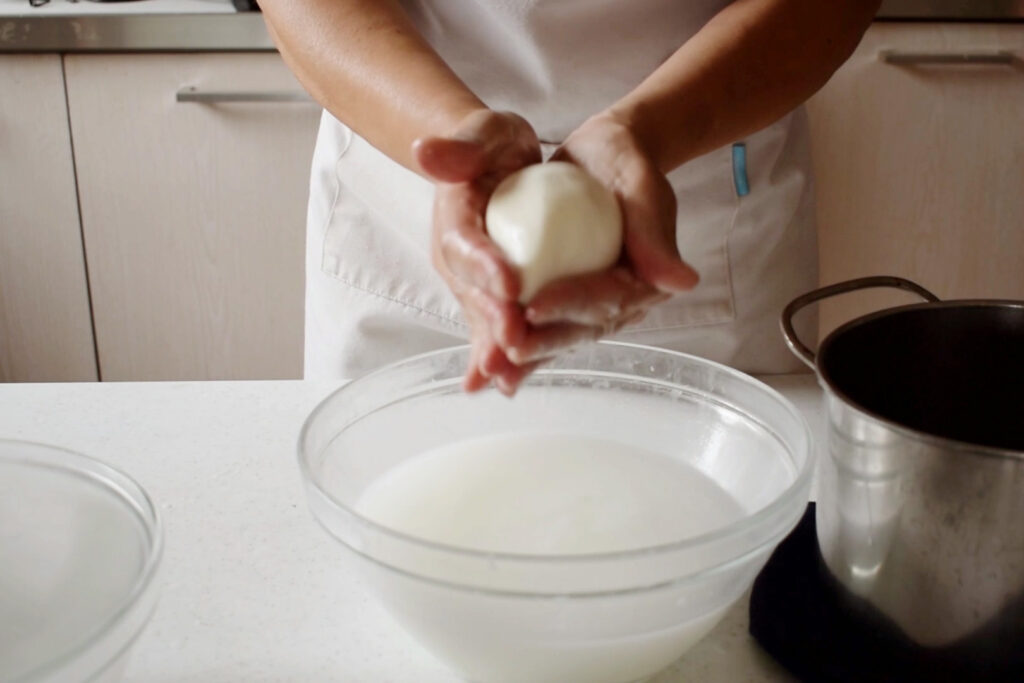
We must delicately work the mozzarella and wrap it around itself as the dough strings. The cheese must be immersed often in hot water until the progressive hardening of the mass is perceived. This stretching process, known as “pasta filata,” gives mozzarella its characteristic texture (7). Once pliable, shape the cheese into balls or braids as desired (8).
Cooling and Storing
After shaping, immediately put mozzarellas in the bowl with cold salted water with ice to set its structure (9). Store the cheese with his salted water in refrigerator for 2-3 days.

By following these guidelines, you’ll be well on your way to creating homemade mozzarella with that perfect, professional-quality texture that rivals artisanal producers.
Tips for Achieving the Perfect Homemade Mozzarella Texture
Crafting the ideal texture for your homemade mozzarella requires attention to detail and precision. Follow these expert tips to ensure your cheese achieves that coveted smooth, elastic consistency that melts in your mouth.
Temperature Control
Maintaining the correct temperature throughout the cheese-making process is crucial. Use a reliable cooking thermometer to monitor the milk’s temperature closely. Avoid overheating milk, as this can result in a rubbery texture.
Curd Formation and Cutting
Allow sufficient time for the curd to set properly before cutting. The curd should have a custard-like consistency and break cleanly when cut. Use a long knife to make precise, even cuts in a grid pattern. This uniformity ensures consistent cheese texture throughout.
Stretching Technique
The stretching phase is where the magic happens. Gently stretch and fold the cheese, working quickly to prevent overheating. Aim for a glossy, smooth surface as you shape the mozzarella. The cheese should stretch like taffy without breaking.
Salt Integration
Properly incorporating salt is key to both flavor and texture. Add salt to the hot water used for stretching, or brine the finished cheese briefly. This not only enhances taste but also helps achieve the desired firmness and moisture level in your mozzarella.
Frequently Asked Questions About Making Mozzarella at Home
What type of milk should I use?
For the best results, use raw cow’s milk that hasn’t undergone pasteurization. This milk is typically sold through vending machines or directly from farmers. Supermarket milk, which has been heat-treated, isn’t suitable for mozzarella-making as the high temperatures alter the casein proteins crucial for the stretching phase. Raw milk should be filtered and refrigerated at a maximum of 6°C (42.8°F) within two hours of milking.
Can I substitute ingredients?
While it’s best to stick to the recipe, some substitutions are possible. If you can’t find liquid rennet, you can use rennet tablets, following the package instructions for conversion. For a vegan alternative, consider using vegetable rennet. The whole unsweetened yogurt can be replaced with citric acid, though this may affect the final taste and texture of your mozzarella.
How long does the process take?
The entire mozzarella-making process typically takes about 24 hours from start to finish. This includes heating the milk, adding rennet, cutting the curd, draining, stretching and cooling.
Is homemade mozzarella cost-effective?
While making mozzarella at home can be a rewarding experience, it’s not necessarily cheaper or faster than purchasing high-quality fresh mozzarella from an artisanal producer. The cost-effectiveness depends on factors such as the price of raw milk in your area and the equipment you already own. However, the satisfaction of creating your own cheese and controlling the ingredients often outweighs any potential cost savings.
How to Make Homemade Mozzarella: A Step-by-Step Guide
Ingredients
- 5 liters raw cow’s milk
- 5 teaspoons whole unsweetened yogurt
- liquid rennet see the quantities on the package
- Cold water
- Salt
- Ice
Instructions
- In a large steel pot, add the cold milk and heat over a moderate heat source for approximately 10 minutes. While heating, stir continuously with a wooden spoon to reach a uniform temperature of 40°C (105°F) throughout the milk. Use a cooking thermometer for accuracy.
- Remove the milk from the heat source, and add the yogurt and rennet, stirring gently to combine. This natural culture will help acidify the milk, creating the ideal environment for cheese formation. Cover the pot with a lid and allow it to rest undisturbed for one hour at room temperature. For optimal maturation of the milk, maintain a temperature of 37°C (98°F). To achieve this temperature, place the covered pot of hot milk inside an turned off oven and close the door. During this time, the milk will coagulate, forming a solid curd.
- After the first hour, the milk started to curdle, so with the long blade of a knife we make crisscross cuts to obtain squares. Then we cover the pot with the lid and place a cloth over the lid and let it rest for another 20 minutes to facilitate the separation from the whey.
- After allowing time, you can observe two distinct compounds in the pot: One resembles ricotta in appearance but with a firmer consistency, this is the curd. The other is a yellowish liquid known as whey. Now we break the rennet cubes into smaller pieces with a whisk. Then we cover the pot with a lid and cloth and let it rest for an additional 4 hours to further separate the whey and harden the curd.
- After resting, the curd settles at the bottom of the pan, so using a ladle we remove the whey. Then using a slotted spoon we put the curd in a colander and press well so the remaining whey can drain and allow the curd and its vapors to reach the proper acidity level. The ideal place for draining at a temperature of 37°C (98°F) is inside the turned off oven. After that, once draining finishes, we place the curd on a plate, cover it, and leave it to mature in the turned off oven. The maturation phase lasts about 18 hours.
- To test if the curd has reached the proper acidity level and texture, bring a small pot of water to a boil on the stove. Once boiling, remove the pot from the heat and add a piece of curd. Using a stick, check the curd by twisting it inside the pot. It should form a long thread or feel very elastic and malleable if the acidity is correct. The curd is ready when it starts to stretch during this test.
- We place the curd on a work table and cut it into strips. At the same time, we prepare two small pots of water. We will keep one pot on the stove to boil, maintaining a temperature of 90°C (194°F). The other pot we will keep at a temperature of 50°C (122°F).
- We also prepare another container with 2 liters of very cold water and dissolve 18 grams of salt, stirring with a spoon. This brine, also called preserving liquid, will allow the mozzarella to be preserved for several days. We also add ice cubes.
- In another container we insert the curd strips and first add a little water at 50°C (122°F) to soften it. Then we add two ladles of water at 90°C (194°F) and mix until the mixture begins to take shape.
- Now, the water of the mozzarella is about 70°C (158°F). So with a ladle we remove half the water from the bowl to add the boiling water. From here on it will begin to string. We continue to substitute the warm water with boiling water until a single mass is formed.
- We must delicately work the mozzarella and wrap it around itself as the dough strings. The cheese must be immersed often in hot water until the progressive hardening of the mass is perceived. This stretching process, known as “pasta filata,” gives mozzarella its characteristic texture. Once pliable, shape the cheese into balls or braids as desired.
- After shaping, immediately put mozzarellas in the container of cold salted water with ice to set its structure. Store the cheese with his salted water in refrigerator for 2-3 days.


